Sending Joy Always
Card Base
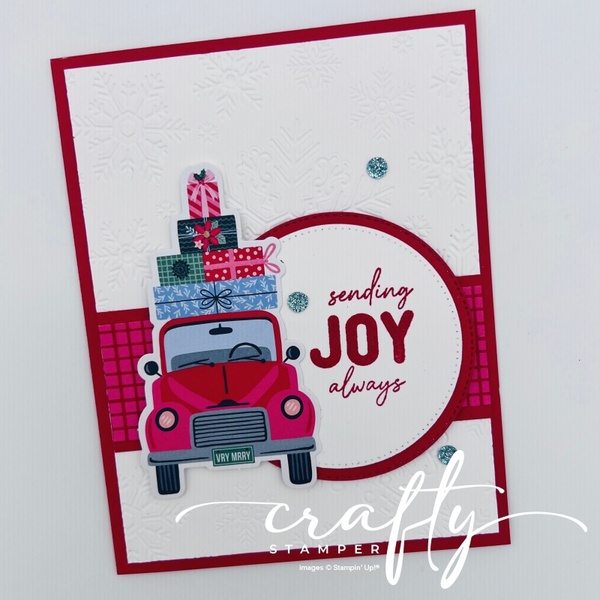
- Real Red: 5-1/2″ x 8-1/2″, score at 4-1/4″
Card Front
- Basic White: 5-1/4″ x 4″, emboss with the Dreamy Snowflakes Embossing Folder
- Real Red: 4″ x 1-1/2″, horizontal strip
- Creative Celebrations Mix & Match Specialty Designer Series Paper: 4″ x 1-1/4″, horizontal strip
- Real Red: Cut largest circle using Stylish Shapes Dies
- Basic White: Cut second-to-largest circle using Stylish Shapes Dies
- Happiest Season Tags Mix & Match Ephemera Pack: Choose the truck with presents and position it to the left of the circle, leaving some DSP visible in the background.
- Holly Jolly Branches Stamp Set: Stamp the “sending JOY always” sentiment on the Basic White circle.
- Embellishments: I used some from last Christmas, but use whatever you have that coordinates with your card!

Inside of the Card
- Basic White: 5-1/4″ x 4″
- Christmas Mice Stamp Set: Stamp “Merry Christmas” in Secret Sea
- Creative Celebrations Mix & Match Specialty Designer Series Paper: 4-1/4″ x 1″, adhere along the bottom of the Basic White layer.
Assembly Instructions
- Fold the Real Red card base along the score line and burnish with a bone folder.
- Emboss the Basic White card front using the Dreamy Snowflakes Embossing Folder. Adhere to the card base.
- Layer the Creative Celebrations DSP over the Real Red horizontal strip and adhere across the card front.
- Die cut the two circles using the Stylish Shapes Dies. Layer the Basic White circle onto the Real Red circle.
- Stamp the sentiment from Holly Jolly Branches onto the Basic White circle. Adhere the layered circles toward the right side of the card.
- Add the truck and presents ephemera to the left side of the circle, allowing some of the DSP to show behind it. Use Stampin’ Dimensionals for added dimension.
- Finish the card front with your favorite embellishments.
- For the inside, stamp Merry Christmas from the Christmas Mice Stamp Set in Secret Sea onto the Basic White layer.
- Adhere the 1″ DSP strip along the bottom of the inside layer, then attach the completed layer to the inside of the card.
Craft Your Way! 💗
Don’t have the exact embellishments I used? No worries! Shop your stash and use what you have. That’s part of the fun of creating handmade cards — making each one your own!